You can setup pdf butler previewer for generated contracts by following below steps and creatin g an apex class.
Data Sources: #
To start with document generation in PDF Butler, we need to create three key data sources. These data sources will be used to structure the contract documents. First, navigate to the Data Source tab and click the “New” button.
-
Create the first Data Source #
- Record type: KEYVALUE;
- Click Next
- Fill in the required fields:
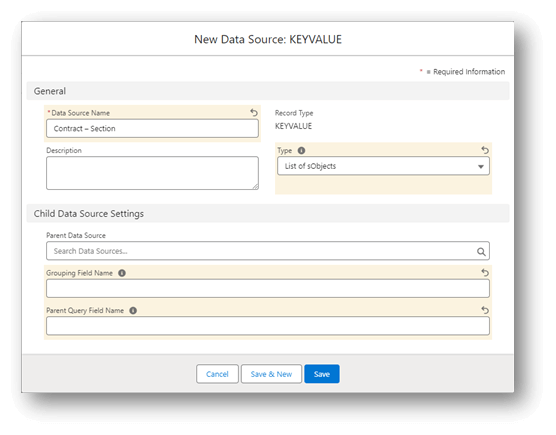
Data Source Name: Contract – Section;
Type: List of sObjects;
Description: (optional); - Child Data Source Settings – leave as default
- Click Save
-
Create the second Data Source #
- Record type: KEYVALUE;
- Click Next
- Fill in the required fields:
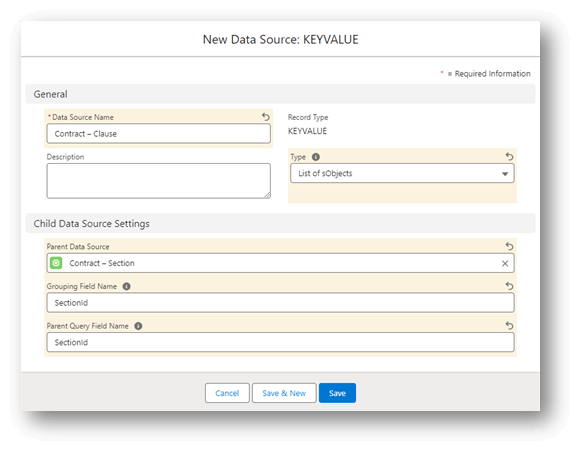
Data Source Name: Contract – Clause;
Type: List of sObjects;
Description: (optional); - Child Data Source Setting:
Parent Data Source: Contract – Section;
Grouping Field Name: SectionId;
Parent Query Field Name: SectionId; - Click Save
-
Create the third Data Source #
- Record type: KEYVALUE;
- Press Next
- Fill in the required fields:
Data Source Name: Contract – Subclause;
Type: List of sObjects;
Description: (optional); - Child Data Source Setting:
Parent Data Source: Contract – Clause;
Grouping Field Name: ClauseId;
Parent Query Field Name: ClauseId; - Click Save
-
Create the fourth Data Source #
- Record type: KEYVALUE;
- Press Next
- Fill in the required fields:
Data Source Name: Contract Name;
Type: Single sObject;
Description: (optional); - Click Save
DocConfig #
After the data sources created, lets create the Doc Config. Open the Doc Configs tab from the PDF Butler and press New. Select Main Word Document as record type and click Next. Fill the Doc Config Name and Save.
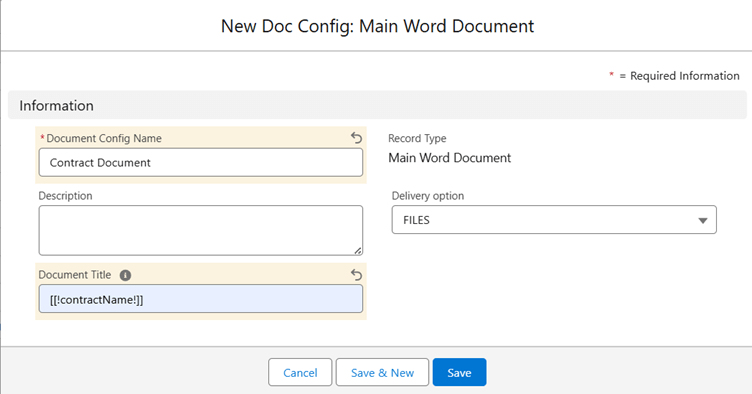
Open the PDF Butler editor using custom link in the bottom of the page
Upload the Doc Config Document. In the document you must have the nest structure (without any borders). Download the document here.
Add Data Sources
- Contract Name and add field as shown in below screenshot

- Contract – Section and add fields as shown in below screenshot
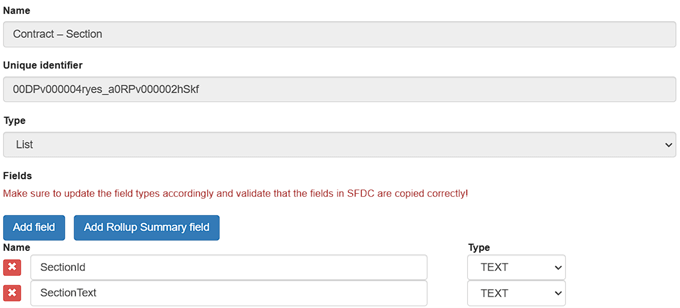
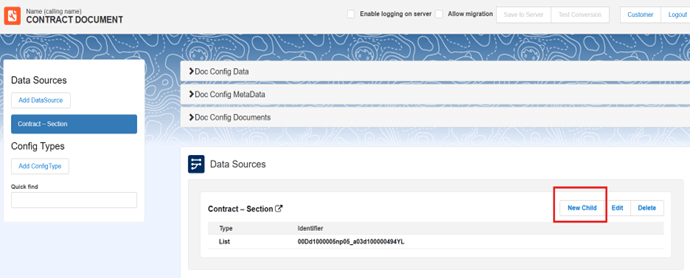
- Once Contract – Section Data Source is added, you will find
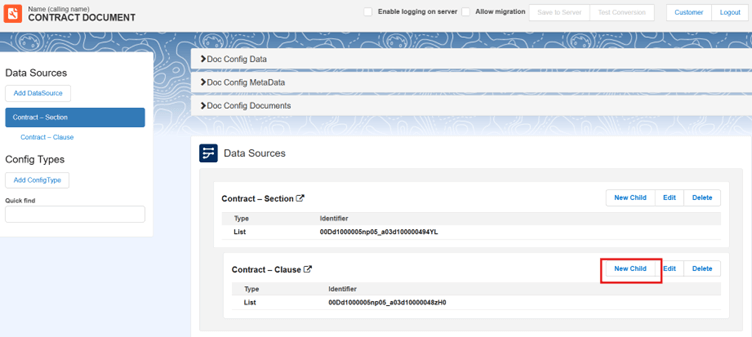
Contract – Clause Data Source when you click on New Child of the Section Data Source
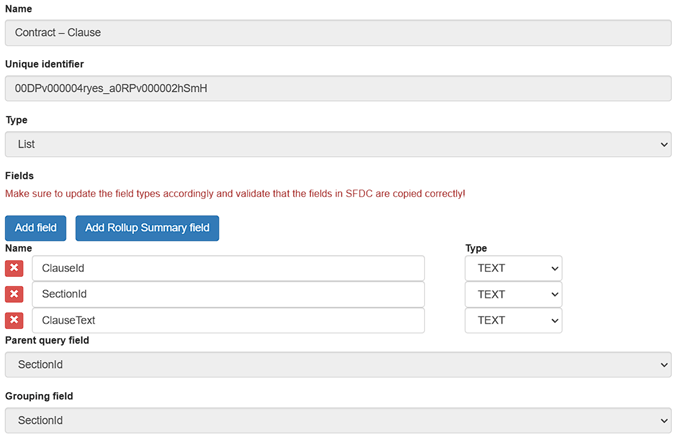
- Add Contract – Clause DataSource and add fields as shown in below screenshot
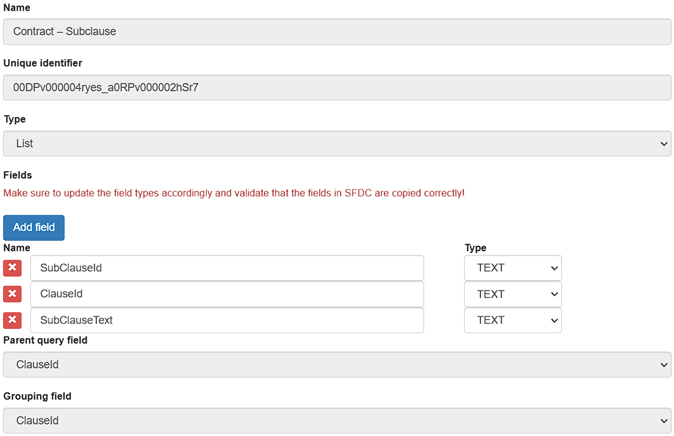
- Once Contract – Clause DataSource is added, you can add Contract – Subclause as a New Child to it
- Add Contract – SubClause DataSource and fields as shown in below screenshot
Config Types #
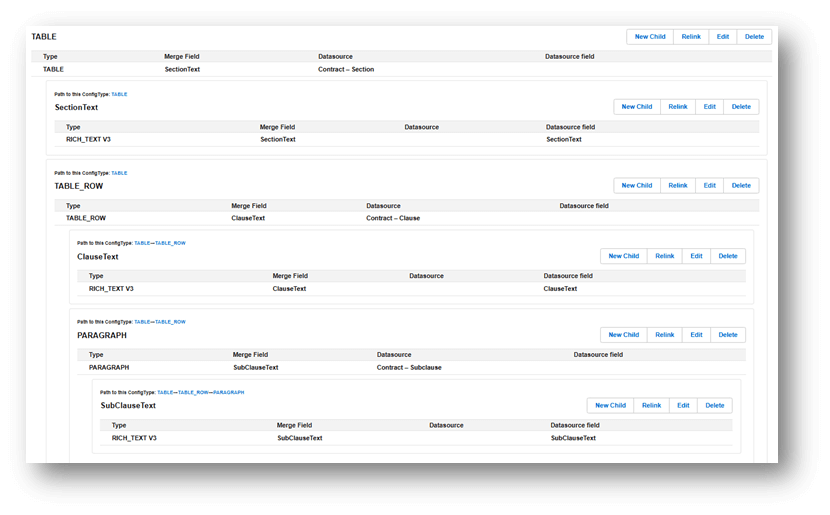
Note: SectionText and TABLE_ROW should be created as Child ConfigTypes to TABLE and make sure to Select the correct Data Source as per the table
| No | Name | Type | Datasource | MergeField | DataSourceField |
|---|---|---|---|---|---|
| 1 | TABLE | TABLE | Contract – Section | SectionText | |
| 1.1 | SectionText | RICH_TEXT V3 | Parent | SectionText | SectionText |
| 1.2 | TABLE_ROW | TABLE_ROW | Contract - Clause | ClauseText | |
| 1.2.1 | ClauseText | RICH_TEXT V3 | Parent | ClauseText | ClauseText |
| 1.2.2 | PARAGRAPH | PARAGRAPH | Contract - Subclause | SubClauseText | |
| 1.2.2.1 | SubClauseText | RICH_TEXT V3 | Parent | SubClauseText | SubClauseText |
| 1.3 | contractName | Title | Contract Name | contractName | contractName |
Configure Actionable Data Sources #
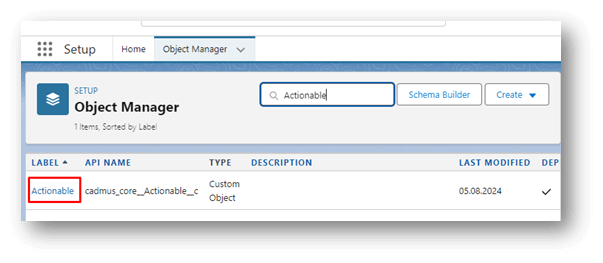
After creating the data sources, we need to configure actionable data sources to manage the relationships and layouts. Go to Setup by clicking the gear icon at the top right corner. In the Object manager tab → Search, type “Actionable“.
We need to create a Lookup for the Data Source. To do this, follow these steps:
- Click Fields & Relationships → New
- Data Type: Lookup Relationship → Next
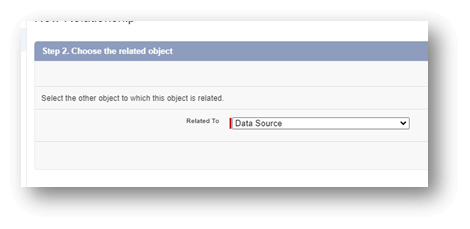
- Related To: (select from the dropdown list) Data Source → Next

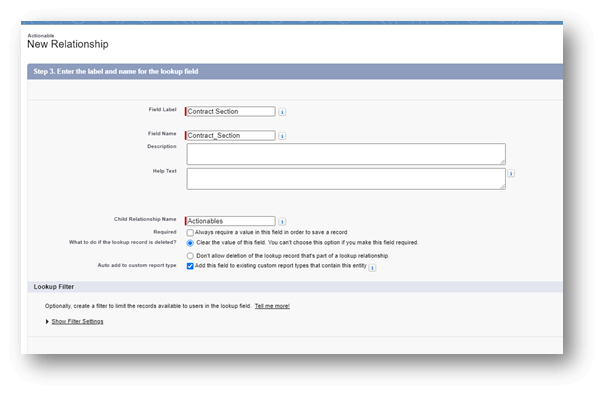
- Fill in all the required information on the page:
Field Label: Contract Section
API Name: Contract_Section
Leave other fields as default
Click Next

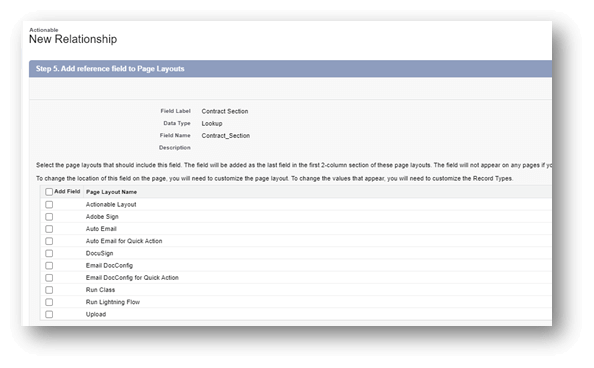
- On the next page, select all profiles that should have access to this field.
- Remove it from all Page Layouts (You can click the Visible button twice – the first click will add it to all, and the second click will remove it from all).

- Next, we go to the last page, we keep all the settings as default.
- Click Save
Create Contract3Layers class #
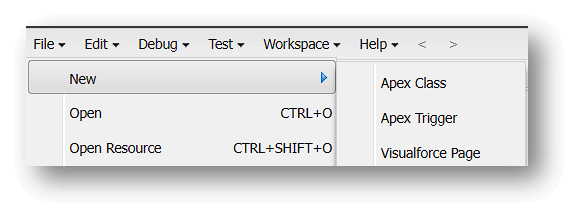
Type new apex class Name like: Contract3Layers, press OK and Paste the below code inside,
global with sharing class Contract3Layers implements cadmus_core.AbstractBeforeActionable  {
    global void execute(cadmus_core__Actionable__c actionable,
            Id docConfig,
            Id objectId,
            Map<String, Object> inputMap,
            cadmus_core.ConvertController.ConvertDataModel cdm) {
        Id recordId;
        String contractName;
        List<Opportunity> opportunities = new List<Opportunity>();
        List<cadmus_contract__ContractInstance__c> contractInstances = new List<cadmus_contract__ContractInstance__c>();
        System.debug(objectId);
        if(Schema.Opportunity.getSObjectType() == objectId.getSobjectType()){
            opportunities = [SELECT Contract.Id, Account.Name FROM Opportunity WHERE Id = :objectId WITH USER_MODE];
            if(opportunities.isEmpty()) return;
            contractInstances = [SELECT Id, Name, cadmus_contract__Contract__c, cadmus_contract__SourceRecord__c FROM cadmus_contract__ContractInstance__c WHERE cadmus_contract__Contract__c = :opportunities[0].Contract.Id WITH USER_MODE ORDER BY CreatedDate DESC ];
            if(contractInstances.isEmpty()) return;
            objectId = contractInstances[0].Id;
            contractName = contractInstances[0].Name;
        }
        if (Schema.cadmus_contract__ContractInstance__c.getSObjectType() == objectId.getSobjectType()){
            contractInstances = [SELECT Name, cadmus_contract__SourceRecord__c FROM cadmus_contract__ContractInstance__c WHERE Id = :objectId  WITH USER_MODE];
            contractName = contractInstances[0].Name;
            recordId = objectId;
        }
        Map<Id, cadmus_contract.ContractInstanceController.ContractItemView> contractItemViews = new Map<Id, cadmus_contract.ContractInstanceController.ContractItemView>();
        List<cadmus_contract.ContractInstanceController.ContractItemView> contractItems = cadmus_contract.ContractInstanceController.getContractItemsByVersion(
                objectId, ''
        );
        for(cadmus_contract.ContractInstanceController.ContractItemView contractItem : contractItems){
            contractItemViews.put(contractItem.id, contractItem);
        }
        Map<String, String> contractData = new Map<String, String>();
        contractData.put('contractName', contractName);
        List<Map<String, String>> sections = new List<Map<String, String>>();
        List<Map<String, String>> clauses = new List<Map<String, String>>();
        List<Map<String, String>> subclauses = new List<Map<String, String>>();
        Map<Id,  cadmus_contract.ContractInstanceController.ContractItemView> mergedItems = new Map<Id,  cadmus_contract.ContractInstanceController.ContractItemView>();
        try {
            cadmus_contract.ContractMergeController mc = new cadmus_contract.ContractMergeController();
            Map<String, String> rlf = new Map<String, String>();
            mergedItems = mc.getMergedContractItemView(contractInstances[0].cadmus_contract__SourceRecord__c, contractItemViews, rlf);
        } catch (Exception ex) {
            System.debug(ex.getMessage());
            throw new AuraHandledException(ex.getMessage());
        }
        for(cadmus_contract.ContractInstanceController.ContractItemView contractItem : contractItemViews.values()){
            switch on contractItem.type {
                when 'Section' {
                    Map<String, String> sectionMap = new Map<String, String>();
                    sectionMap.put('SectionId', contractItem.name);
                    sectionMap.put('SectionText', contractItem.text);
                    if(contractItem.isUnnumbered) {
                        sectionMap.put('SectionNr', '');
                    } else {
                        sectionMap.put('SectionNr', contractItem.name);
                    }
                    sections.add(sectionMap);
                }
                when 'Subsection' {
                    Map<String, String> subSectionMap = new Map<String, String>();
                    subSectionMap.put('SectionId', contractItem.name);
                    subSectionMap.put('SectionText', contractItem.text);
                    subSectionMap.put('SectionNr', contractItem.name);
                    sections.add(subSectionMap);
                }
                when 'Clause' {
                    Map<String, String> clauseMap = new Map<String, String>();
                    clauseMap.put('ClauseId', contractItem.name);
                    clauseMap.put('SectionId', contractItem.parentName);
                    clauseMap.put('ClauseText', contractItem.text);
                    clauseMap.put('ClauseNr', contractItem.name);
                    clauses.add(clauseMap);
                }
                when 'Subclause' {
                    Map<String, String> subClauseMap = new Map<String, String>();
                    subClauseMap.put('SubClauseId', contractItem.name);
                    subClauseMap.put('ClauseId', contractItem.parentName);
                    subClauseMap.put('SubClauseText', contractItem.text);
                    subclauses.add(subClauseMap);
                }
                when else {}
            }
        }
        String sectionDs = '00DAP000006lPh3_a0YAP000001h7gn';
        String clauseDs = '00DAP000006lPh3_a0YAP000001h7iP';
        String subClauseDs = '00DAP000006lPh3_a0YAP000001h1Bc';
        String contractNameDs = '00DAP000006lPh3_a0YAP000001hSWj';
        List<String> dsList = new List<String>{sectionDs, clauseDs, subClauseDs, contractNameDs};
        List<cadmus_core__Data_Source__c> dss = [SELECT Id, Name, cadmus_core__CustomerDataSourceId__c, cadmus_core__Image_Name__c
            FROM cadmus_core__Data_Source__c
            WHERE cadmus_core__CustomerDataSourceId__c IN :dsList
            WITH USER_MODE];
        Map<String, cadmus_core__Data_Source__c> dsMap = new Map<String, cadmus_core__Data_Source__c>();
        for(cadmus_core__Data_Source__c ds : dss){
            dsMap.put(ds.cadmus_core__CustomerDataSourceId__c, ds);
        }
        inputMap.put(dsMap.get(sectionDs).Id, sections);
        inputMap.put(dsMap.get(clauseDs).Id, clauses);
        inputMap.put(dsMap.get(subClauseDs).Id, subclauses);
        inputMap.put(dsMap.get(contractNameDs).Id, contractData);
    }
}
Then replace next ids in the code with your real values:
- sectionDs – is Contract – Section datasource Customer Data Source Id.
- clauseDs – is Contract – Clause datasource Customer Data Source Id.
- subClauseDs – is Contract – Subclause datasource Customer Data Source Id.
- contractNameDs – is Contract Name datasource Customer Data Source Id.
Create New Page Layout #
The next step is to create a new Page Layout. On the Actionable object, navigate to the Page Layouts section and click New.
-
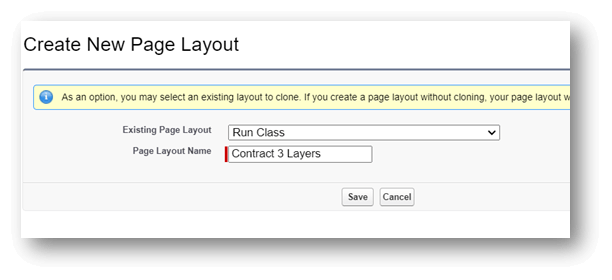
- Fill in all the required information
Existing Page Layout select = Run Class
Page Layout Name = Contract 3 Layers
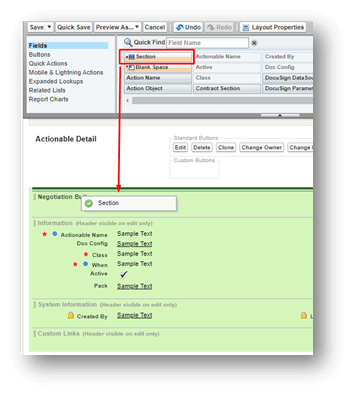
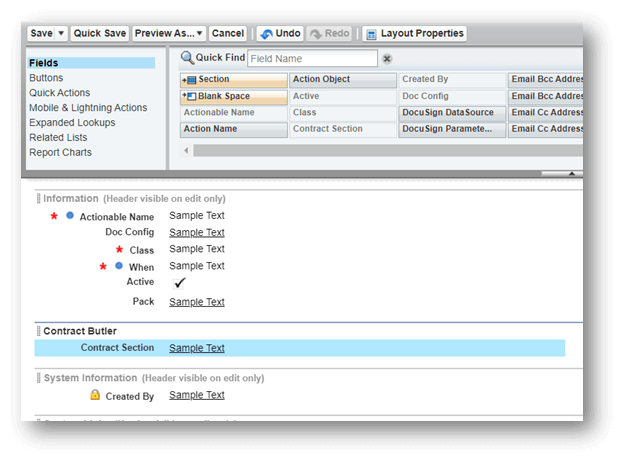
Click → Save - Add Section to the Page LayoutAt the top of the list of Fields that can be added to the Layout, select Section and drag it to an allowed (green) zone.

Section Name: Contract Butler. Leave all other settings unchanged. - From the list of available Fields, select Contract Section. Drag and drop the Contract Section field into the newly added section named Contract Butler.

In the top left corner, click Save.

- Fill in all the required information
Create Record Type #
Next, we need to create a new Record Type. Click New
- Fill in all the required fields
Existing Record Type: — Master —
Record Type Label: Contract 3 Layers
API Name: Contract_3_Layers
Active: TRUE - On the next page, select the created Contract 3 Layers layout. Leave all other settings unchanged and Click Save
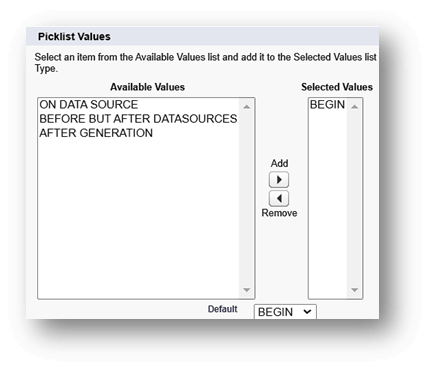
In the opened editing window, navigate to the Picklists Available for Editing section. Edit picklist When and Ensure that only the BEGIN condition is selected.
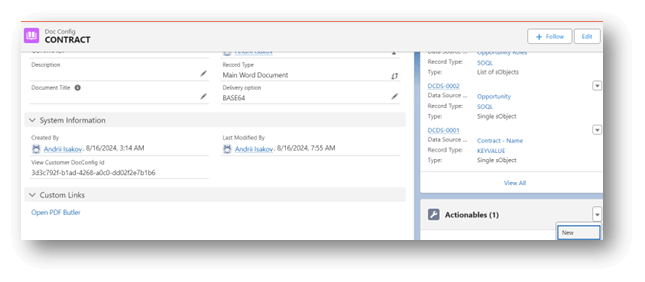
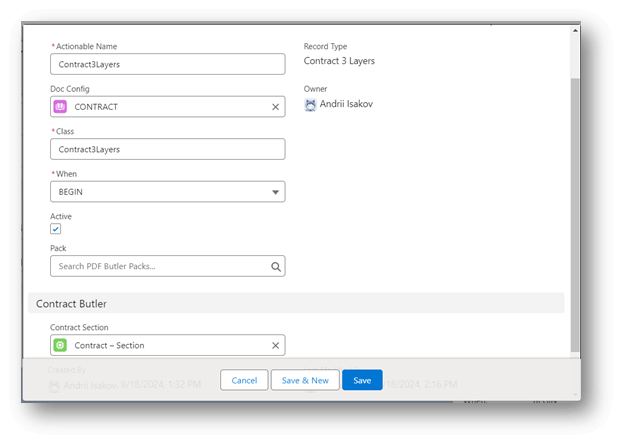
Create Actionable on Doc Config #
Create PDF Butler Pack #
Open PDF Butler Packs from the PDF Butler app and create the new pack. Fill the Name field and select the previously created DocConfig as Leading Doc Config. Press Save.
CONTRACT Butler Admin #
Open the App Launcher and type “CONTRACT Butler Admin”. Open the tab.
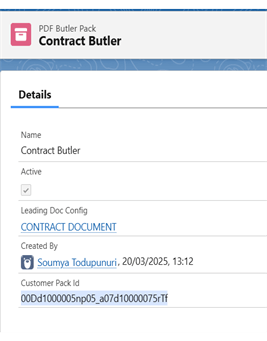
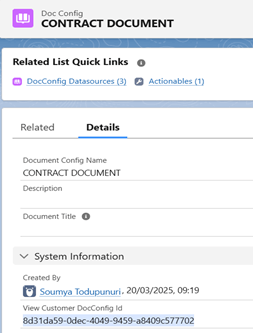
Go to the PDF&SIGN Butler tab and enter the Customer Document Config Id and Customer Pack Id that were created in previous steps. Click Save.

Configure Opportunity Record Page #
- Open the Opportunity record and using setup gear, open Edit Page.
- From the Components window, from Custom tab, drag the PDF Butler Convert Component and drop whenever place you want.
- In the element settings, fill the DocConfig to retrieve, past the Customer Document Config Id, then Save and return to Opportunity
Note: Create Agreement button is already given in the starter pack. Please go through that or customize agreement creation according to your business process.
Once Agreement is created from Opportunity, you will be navigated to Agreement document as below

You can preview it in the pdf by clicking Show Preview button. From preview window, you can download the PDF and file will have the Contract Name of the opportunity to as its file name. As we created TITLE Configtype and mapped it to Contract Name.
You can open any existing Agreements from Agreement Tab of your Contract Butler app and preview it in pdf format.
